murals | wall finishes | designjess artistic designs

DIY Crocodile Wall Finish

crocodile decorative wall finish on a door

Now is a great time to take on DIY projects, especially this beautiful crocodile wall finish. In light of the stay-at-home order, we are all keeping inside the four walls of our homes. I say, why not give those walls a freshening up? There is a certain zen to painting that may just be the distraction you need.

Here’s a fun project I did recently, with the help of a crocodile roller. A crocodile roller is exactly what it sounds like: a roller that creates a crocodile-skin pattern on your surfaces. It will add a pop of fun and vitality to your home, for sure!

To try it yourself, you’ll need:

-A crocodile roller, Krok Express Roll (you can find one here: https:// www.paintanddesignstore.com)
-1 Gallon Satin Finish Latex Paint (I like Benjamin Moore brand, in the color Upper West Side)
-1 Pint of Valspar Limewash Glaze (you can find this at Lowes)
-Paintbrush

Pro Tip

If doing a large wall, I like to section off small areas. It makes the area less overwhelming. I treat the areas like I’m hanging wallpaper, sectioning off 36" X the height of your walls. Or be creative and do a square pattern everywhere. My door panels are easy because they are sectioned off for me.

apply base coat to the door panel

Apply Base Coat

First, you’ll want to give your area a base coat, with the satin latex paint. You can also use eggshell finish, but flat paint will not work: it absorbs the glaze too quickly. If you try to use a sheen like semigloss or gloss, your roller will slide on the surface and it won’t work well either.

brush on lime wash glaze to the door panel

Apply Lime wash

After your base coat has dried, apply your lime wash glaze with a brush. Try to paint it as evenly as possible by using the tip of your paint brush.

roll the crocodile roller through the center of the panel

Roll Your Crodile Roller

Next, roll your Crocodile roller through the center of your area. Then roll it through each side, going from the center to the left, then from the center to the right. Blot off excess paint from your roller as you go. If you mess up an area, just wipe the glaze away and start again. The old adage “practice makes perfect” has never been more key!

Need Extra Help?

Leave a comment if you need more guidance with your project. I'm here to help 🙂 Want to leave your crocodile wall finish up to a pro and live in the Charleston, South Carolina area? Contact me!

5 comments
Add a comment...

Your email is never published or shared. Required fields are marked *

  • cbd oilThanks a bunch for sharing this with all folks you really know
    what you are speaking about! Bookmarked. Kindly also
    consult with my web site =). We may have a link trade agreement among
    usReplyCancel

  • sloth hiking team t shirtI was pretty pleased to find this great site.
    I need to to thank you for ones time due to this fantastic read!!

    I definitely liked every little bit of it and i
    also have you saved to fav to see new things in your blog.ReplyCancel

  • custom printed notebook journalsHi! I was able to have sworn I’ve been to this website before but after checking through several of
    the post I realized it’s a novice to me. Nonetheless, I’m definitely happy I came across it and I’ll
    be book-marking and checking back frequently!ReplyCancel

  • YukZHoyingAppreciation to my father who informed me regarding this webpage,
    this webpage is really amazing.ReplyCancel

Paint Faux Wood Floor

wood graining paint tool and glaze

This is a great DIY project to give your cement floor a rustic makeover—without breaking the bank!! The cost of re-tiling this basement floor with faux wood tiles was an estimated $5,000. I was able to paint the cement to resemble the same wood tile I found at the home improvement store, spending a mere $300. Guess what—you can too!

In order to do this project, your concrete floor must be very clean. First, I sanded, vacuumed, and filled in any cracks and holes with cement filler (which is available at any home improvement store). Follow along as I give a step-by-step guide on how to create a stunning faux wood with paint. This technique isn't limited to floors: It can also be used on walls and furniture. As a frame of reference, the space I worked with was 600 sq FT. Please adjust your supplies to whatever sized space you’re working with.

      SUPPLY LIST

  • 1 gallon Low Sheen Benjamin Moore Porch and Floor Paint

  • 3 sample pint paints: 1 in Cloud White, 1 Deep Creek & 1 in Topeka Taupe

  • 2 quarts of Acrylic Glaze

  • Wood grain tool (you can purchase these online, or at a home supply store)

  • Rolls of painter’s tape

  • 1 gallon acrylic polyurethane low luster sheen (Clear Coat)... I like Benjamin Moore's.

glazing medium and pints of Benjamin moore paint

Paint your designated area with the Porch and Floor Paint, and allow to dry. Then, mix up your three pint colors (the Cloud White, Deep Creek, and Topeka Taupe) in separate containers, each with the acrylic glaze. For each container, you will want a ratio of one part paint to three parts glaze.

a piece of wood tile from Lowes Home and Improvment in Summerville, South Carolina

Here is the tile I found at the home improvement store. I used it as a template to mark the entire floor with my faux wood design. I suggest purchasing one to use as a stencil and guide.

brushing out the glazing medium with faux brush

You’ll want to tape off the tile section you’re painting. Next, take your Topeka Taupe/glazing mixture, and brush it across the taped area.

wood5

Then, brush across the taped area with the Deep Creek Glaze, and then finally the Cloud White.

How to use Wood Graining Paint Tool Decoration DIY on your floor

Now take your wood grain tool and drag it across the glaze mixture. Allow to dry and remove the tape.

wood8
Now work your way across the floor, taping alternating sections in a tile pattern. Be sure that the Porch and Floor base has dried before painting on your glaze mixture. Yes, this part will be time-consuming, but oh so worth it: by the end, you’ll have what looks like an authentic wood floor, at a sixth of the price!
beautiful hand painted faux wood floors on concrete

I love to see your projects! Please share what you created with your wood grain tool 🙂

    Want to get new blog updates? Subscribe today!

Writing content by Carson McKenna. To contact her for website content/social media services, email: carsonmckennawriter@gmail.com

0 comments
Add a comment...

Your email is never published or shared. Required fields are marked *

    How to Color Glaze Walls

    faux brushes and colors of glazes used on diy project
    Home office wall that have been fauxed a french blue glaze
    Home office pictured with the chandelier in New York City Upper East Side
    Home office with metallic champage painted trim

    You can apply the technique of “decorative painting,” (also known as color washing) in order to accent walls, furniture, and entire rooms (you can also go for a linen look, as shown in my previous blog post, “How to Paint a Flag” )...

    My first blog post was a lot about glazing, and I thought maybe I should talk more about this basic technique that has so many applications. You can glaze anything from walls to furniture, and it's great for adding depth, softness, and texture.

    I mixed three different glaze colors by using one part latex paint to five parts glaze. You can adjust the ratio depending on how translucent you want your glaze to be (more glaze=lighter color). The colors I used here are Labrador Blue, Amethyst Shadow, and North Sea.

    First, I painted the walls in Blue Haze with in an eggshell finish

    first step of DIY by brushing down the color glaze
    DIY step of all the glaze colors on the wall
    using a rag dab and blend out the glaze, leaving a texture behind

    With your paint brush spread out paint color in an even pattern across the wall. It's quicker and easier to have a separate brush for each different color and glaze that you’re using.

    Here, you can see all the different glaze colors spread across the wall. Pro Tip: I like to tape off the borders of each wall (you can see green painter’s tape on the adjacent wall). This makes for a cleaner look and ensures no overlapping.

    Next, take a clean cotton rag and sponge at the glaze, breaking up the brush marks and leaving behind an interesting texture. You can also use a sea sponge.

    brush blending out the glaze
    brush stippling out the glaze
    French style blue glazed faux finished walls with metallic trim

    With a clean, dry, soft, natural bristle brush, start brushing at your glaze to soften and blend the rag marks.

    You can also soften your glaze in certain spots by "pouncing" at it with the tip of your fluffy brush (that’s artsy-speak for blending with repeated, bouncy dabs). Keep working the area until you’re satisfied.

    Wait at least 12 hours for your wall to dry, and then apply a clear coat. I like to use a matte finish. Pro Tip: it's important to seal your glaze, as they are NOT durable and can come off your wall with little effort.

    Now step back, and enjoy what you’ve decorative painted walls!

    Have a project for your home in the Charleston, South Carolina area?

    Call me for free estimate! We can discuss different options today!

    3 comments
    Add a comment...

    Your email is never published or shared. Required fields are marked *

    How to Paint a British Flag Mural

    Mural of Union Jack flag in Children's Bedroom in New York City Upper West Side

    Learn how to paint a mural of a British Flag, aka Union Jack in this DIY post.

    “Anglophilia,” or an appreciation for all things British, has been on the rise in America since Beatlemania struck. In modern times, our British friends are just as celebrated as ever. The British flag carries a fun connotation, bringing to mind pop culture heroes such as the Spice Girls, Harry Potter, Austin Powers, and the Royals. This year’s Best Actress at the Oscars, Olivia Colman, is British!

    I had all this in mind when a client recently called me to do a mural in her child’s room. She loved the Union Jack flag concept, envisioning red shelves to compliment it. I loved the idea of softening the flag with a linen-like fade, so as to make the sleeping area more calming. (Side bar: I love all things linen!!)

    I’m going to take you through the mural painting process step-by-step, so you can replicate this at home!!

    inspiration from a vintage linen stylen flag for mural
    inspiration from a vintage linen for mural

                     SUPPLY LIST

    • 1 gallon eggshell white paint (I really like Benjamin Moore Paints!)
    • 1 quart eggshell paint in Old Navy
    • 1 quart eggshell paint in Million Dollar Red
    • 1 quart eggshell paint in Shoreline
    • 2 quarts of Acrylic Glaze
    • Roll of painter’s tape
    • 1 gallon acrylic polyurethane low luster sheen (Clear Coat)
    • Leveling Tool
    • Measuring tape
    • Brushes (at least one 6 inches wide for glazing, I like natural bristles)
    • Paint roller and tray
    Paints, limewash, and glaze used in DIY project

    Step 1

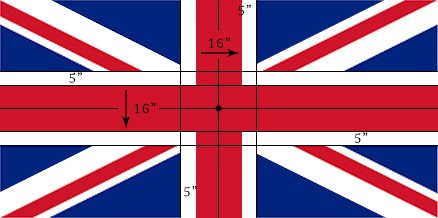
    Paint your designated area with the eggshell white paint and allow to dry. Then begin sectioning off the cross down the center of your mural. I suggest doing the red sections first, then the old navy blue. You’ll want to use a pencil, level tool and measuring tape to get it as approximate as possible. (you can refer to my homemade template pictured here!)

    level tool to use on diy project
    dimensions for the diy mural on how to paint
    green frog tape masks the areas for the diy learn how to paint a mural
    red, white and blue sections of the union jack flag painted

    Step 2

    Now for the fun part: GLAZING! A good glaze-over is the key to creating the beachy fade. You’ll mix up your lime wash with 1 quart of glazing medium and approximately 4 ounces of eggshell paint (I used Shoreline). You’ll want to apply it over the flag in broad, horizontal strokes. Below you will find a YouTube video of me applying the lime wash.

    Allow the glaze to dry 8 hours. Next, you’ll want to apply a protective clear coat with a roller. Let dry at least 4 hours.

    Step 3

    Next apply another layer of lime wash, this time in vertical strokes. The idea is to create a crosshatch “linen” pattern by working the glaze in opposite directions. (Pro-tip: when applying more than one layer of lime wash glaze, apply clear coat in between the dried layers. Glaze creates depth and dimension to your work).

    Let dry overnight and add a final clear coat for extra protection.

    And Voila - you’re done with your new mural! Please share with me how this goes for you. 🙂 I love to see pictures!!

    step ladder in front of union jack mural
    Jessica Kollar painting a mural
    linen faux glaze

    Want to find out more about the artist Jessica?

    Also follow her on Instagram!

    8 comments
    Add a comment...

    Your email is never published or shared. Required fields are marked *

    • CorneliaLove this! I’m going to try at home 🙂 ReplyCancel

    • KieranHave you ever before had issues with your hosting?
      I’m open for referrals as my webhost is dreadful now.ReplyCancel

    • BernieceI located your internet site from Google and also I need to state
      it was a fantastic discover. Many thanks!ReplyCancel

    • vurtil opmerI love the efforts you have put in this, thank you for all the great content.ReplyCancel

    • composition notebooks college ruledThis is very interesting, You’re a very skilled blogger.
      I’ve joined your feed and look forward to seeking more of your magnificent post.
      Also, I have shared your website in my social networks!ReplyCancel

    • LovieADoonerUsually I don’t read post on blogs, but I wish to claim
      that this write-up very forced me to take a look at and do it!
      Your writing taste has been amazed me. Thanks a lot,
      very nice article.ReplyCancel

    Jessica Kollar artist sitting in front of a mural she painted

    Welcome

    Jessica Kollar is an imaginative illustrator, painter, and designer who is driven by an incredible passion for self-expression through art. Her works are often noted for their unique style, elegance, and technique. With her use of exceptional color and intuition her work makes an excellent choice for a wide range of projects.

    Instagram

    follow us @jesskollar

    located in Charleston, south carolina