.jpg)
Learn how to paint a mural of a British Flag, aka Union Jack in this DIY post.
“Anglophilia,” or an appreciation for all things British, has been on the rise in America since Beatlemania struck. In modern times, our British friends are just as celebrated as ever. The British flag carries a fun connotation, bringing to mind pop culture heroes such as the Spice Girls, Harry Potter, Austin Powers, and the Royals. This year’s Best Actress at the Oscars, Olivia Colman, is British!
I had all this in mind when a client recently called me to do a mural in her child’s room. She loved the Union Jack flag concept, envisioning red shelves to compliment it. I loved the idea of softening the flag with a linen-like fade, so as to make the sleeping area more calming. (Side bar: I love all things linen!!)
I’m going to take you through the mural painting process step-by-step, so you can replicate this at home!!
.jpg)
.jpg)
SUPPLY LIST
- 1 gallon eggshell white paint (I really like Benjamin Moore Paints!)
- 1 quart eggshell paint in Old Navy
- 1 quart eggshell paint in Million Dollar Red
- 1 quart eggshell paint in Shoreline
- 2 quarts of Acrylic Glaze
- Roll of painter’s tape
- 1 gallon acrylic polyurethane low luster sheen (Clear Coat)
- Leveling Tool
- Measuring tape
- Brushes (at least one 6 inches wide for glazing, I like natural bristles)
- Paint roller and tray
.jpg)
Step 1
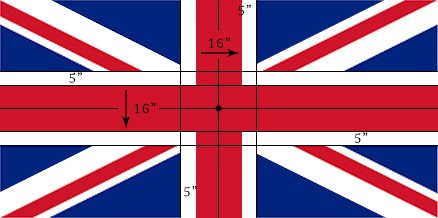
Paint your designated area with the eggshell white paint and allow to dry. Then begin sectioning off the cross down the center of your mural. I suggest doing the red sections first, then the old navy blue. You’ll want to use a pencil, level tool and measuring tape to get it as approximate as possible. (you can refer to my homemade template pictured here!)
.jpg)

.jpg)
.jpg)
Step 2
Now for the fun part: GLAZING! A good glaze-over is the key to creating the beachy fade. You’ll mix up your lime wash with 1 quart of glazing medium and approximately 4 ounces of eggshell paint (I used Shoreline). You’ll want to apply it over the flag in broad, horizontal strokes. Below you will find a YouTube video of me applying the lime wash.
Allow the glaze to dry 8 hours. Next, you’ll want to apply a protective clear coat with a roller. Let dry at least 4 hours.
Step 3
Next apply another layer of lime wash, this time in vertical strokes. The idea is to create a crosshatch “linen” pattern by working the glaze in opposite directions. (Pro-tip: when applying more than one layer of lime wash glaze, apply clear coat in between the dried layers. Glaze creates depth and dimension to your work).
Let dry overnight and add a final clear coat for extra protection.
And Voila - you’re done with your new mural! Please share with me how this goes for you. 🙂 I love to see pictures!!
.jpg)
.jpg)
.jpg)
Want to find out more about the artist Jessica?
Also follow her on Instagram!
.jpg)


CorneliaLove this! I’m going to try at home 🙂
JessicaThanks!
KieranHave you ever before had issues with your hosting?
I’m open for referrals as my webhost is dreadful now.
BernieceI located your internet site from Google and also I need to state
it was a fantastic discover. Many thanks!
JessicaThank you!
vurtil opmerI love the efforts you have put in this, thank you for all the great content.
composition notebooks college ruledThis is very interesting, You’re a very skilled blogger.
I’ve joined your feed and look forward to seeking more of your magnificent post.
Also, I have shared your website in my social networks!
LovieADoonerUsually I don’t read post on blogs, but I wish to claim
that this write-up very forced me to take a look at and do it!
Your writing taste has been amazed me. Thanks a lot,
very nice article.